USB Microphones for Streaming and Podcasting: What Actually Matters
Your headset mic isn't the problem — your room, your gain, and your polar pattern are. Here's how to actually pick a USB or XLR microphone that fits how you stream or record.
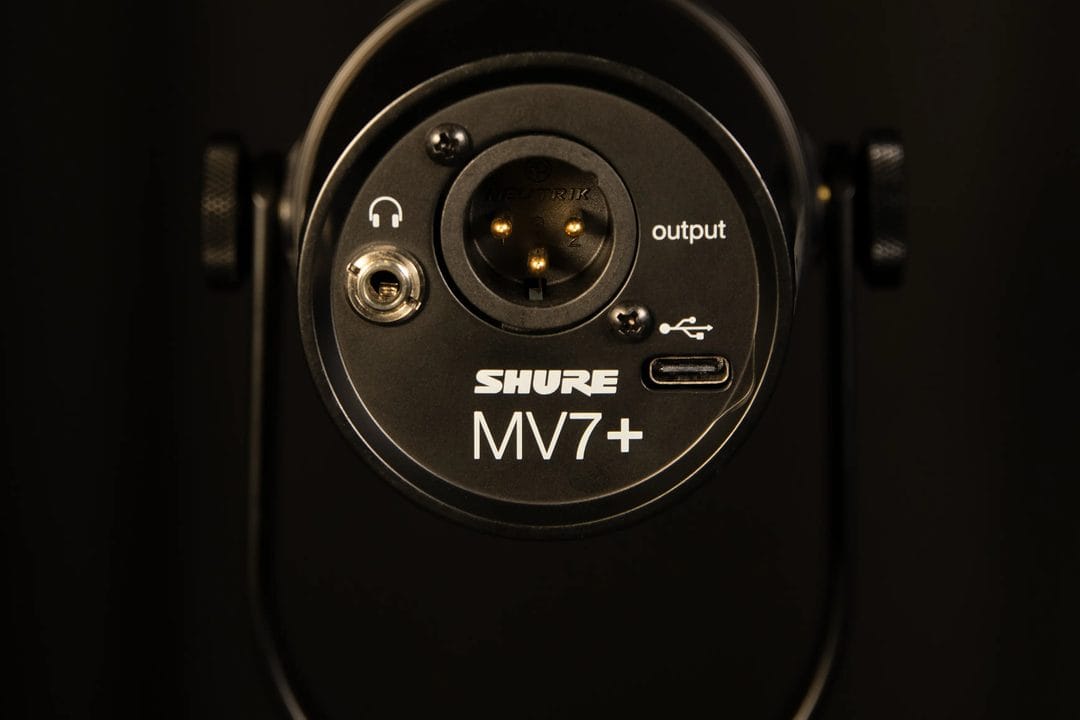
You bought a $150 microphone because three YouTubers recommended it, plugged it into the same USB port your webcam used to occupy, and your voice still sounds like it's coming from inside a shoebox with the lid half-closed. That's not a bad-microphone problem. Nine times out of ten it's a room, gain, or positioning problem wearing a microphone-shaped disguise, and no amount of spending fixes it until you understand what each piece of the chain is actually doing.
Your headset or webcam mic isn't the real bottleneck
Before spending a cent, it's worth naming what's actually wrong with the built-in mic on a gaming headset or a laptop webcam: it's an omnidirectional capsule the size of a grain of rice, mounted an inch from your mouth, with zero acoustic treatment around it. It picks up your breathing, your keyboard, the fridge compressor two rooms over, and your voice — all at roughly the same volume. A $99 dedicated USB mic with a cardioid pattern and a body large enough to house a real diaphragm will out-perform a $250 gaming headset's mic every time, because the headset mic was never designed to be the star of the signal chain. It was designed to be good enough for Discord and nothing more. Compare a HyperX Cloud II boom mic recording to one from a $99 Rode NT-USB Mini and the gap is obvious even on cheap laptop speakers — the headset sounds thin and slightly metallic, while the dedicated mic captures the low-mid warmth of an actual voice. Headset marketing leans on noise-cancellation software rather than raw capsule quality for a reason; the software is compensating for hardware never built to carry a solo voice track.
That said, don't assume the mic itself is where most of your budget should go. A $100 microphone in a properly positioned setup — six inches away, off-axis from your PC fans, with a $15 foam windscreen — will consistently beat a $400 microphone shouted into from across a bare-walled bedroom with a mechanical keyboard six inches from the capsule. Room and technique account for more of what listeners hear than the spec sheet does, and every audio engineer who's mixed a podcast will tell you the same thing without hesitating.
Dynamic vs. condenser: pick based on your room, not the hype
This is the single most consequential decision in the whole buying process, and it comes down to one question: does your room have any sound treatment, or is it a bedroom with hard walls, a desk, and a window?
- Condenser microphones (Blue Yeti, Audio-Technica AT2020USB+, Rode NT-USB Mini) are more sensitive and pick up a wider frequency range, which sounds great in a treated room and sounds like a boomy, echoey mess in an untreated one.
- Dynamic microphones (Shure MV7, Rode PodMic, Shure SM7B) are less sensitive by design — they reject off-axis sound, which is exactly what you want if your "studio" is a spare bedroom with a bed, a desk, and nothing on the walls to absorb reflections.
- If you're not sure which category your room falls into, clap your hands in the middle of it. A sharp, ringing echo means untreated — buy dynamic. A quick, dead thud means you're fine with condenser.
For most men setting up a streaming or podcasting rig in a normal bedroom or home office, get a dynamic mic. The Shure MV7 at roughly $249 is the one to buy if you want both USB and XLR outputs in a single unit that won't need replacing when you eventually add an audio interface — it's become the default recommendation among podcast editors precisely because it forgives untreated rooms in a way condensers can't.
USB vs. XLR: when the extra box is actually worth it
A USB microphone plugs straight into your computer and handles the analog-to-digital conversion internally. An XLR microphone needs a separate audio interface — something like a Focusrite Scarlett Solo (around $120) — to do that conversion, plus phantom power if the mic requires it.
Skip the audio interface entirely if you're a solo streamer or podcaster who records one voice at a time and doesn't plan to record local multi-track audio for a co-host. A good USB mic — the Elgato Wave:3 at $99.99 or the Rode NT-USB Mini at $99 — gets you 90% of the quality with none of the extra cabling, none of the extra software to learn, and no separate gain knob to accidentally bump mid-stream.
Go XLR plus interface the moment any of the following is true: you record with a co-host in the same room and need separate tracks for editing, you want to upgrade the microphone later without replacing the signal chain, or you're already spending over $300 on a mic and want headroom to grow. The Shure SM7B ($399) into a Focusrite Scarlett Solo plus a Cloudlifter CL-1 ($149) for clean gain is the setup most professional podcasters converge on — not because it's trendy, but because dynamic mics like the SM7B need more gain than most interfaces provide alone, and the Cloudlifter solves that specific problem.
Polar patterns: the spec nobody explains properly
The polar pattern determines which direction the microphone actually listens in, and getting this wrong wastes money on an otherwise good microphone. Most buyers never check it because the box just says "professional-grade capsule" and leaves it at that.
Cardioid
Picks up sound from the front, rejects sound from the sides and rear. This is the default pattern for solo streaming, gaming voice chat, and single-host podcasting, and it's the one setting most people should leave alone rather than experimenting with the multi-pattern switch just because it's there.
Omnidirectional
Picks up sound evenly from all directions. Useful for a single mic capturing a small group around a table — a board game stream, a group interview — but a poor choice for anyone gaming with a mechanical keyboard or a loud PC nearby, since it captures the room exactly as loudly as it captures you.
Bidirectional and stereo
Less common outside dedicated interview setups (bidirectional, for two people facing each other across a desk) or music and ASMR-style content (stereo). Most men buying their first streaming or podcasting mic will never need either.
Gain staging and monitoring: the two settings that actually matter
Gain is how much the microphone amplifies your voice before it hits the software, and it's the setting most new streamers set once, on day one, and never touch again — which is exactly the mistake. Set gain too high and every consonant clips into harsh digital distortion the moment you raise your voice during an exciting play or a laugh; set it too low and you end up boosting the signal in post-production, which drags the room noise up right along with your voice. The target is simple: speak at your normal volume and watch the meter in whatever software you're using — OBS, Discord, Audacity, GarageBand — and keep peaks between -12dB and -6dB, never touching 0dB. Test this before your first real session, not during it: record thirty seconds at your normal talking volume, then thirty seconds at the volume you hit when something goes wrong on stream, and check that neither one pins the meter into the red. Dynamic mics like the SM7B or PodMic typically need more gain to reach that range than condensers do, which is exactly why a Cloudlifter or an interface with clean preamp gain matters more for dynamic setups than the marketing copy usually admits. Revisit the setting any time you move the mic, change rooms, or swap headsets, because gain is tied to distance and room acoustics, not just the microphone itself.
Monitoring means listening to your own mic in real time through headphones, and it's the feature people skip because it feels unnecessary until the first stream where they didn't realize their gain had crept up mid-session. Every mic worth buying at $99 or above has a headphone jack built into the mic itself for zero-latency monitoring — use it. Without it, you're trusting that everything sounds fine based on nothing, and the first time you'll find out otherwise is when a clip of you clipping badly ends up on a highlight reel.
What to actually buy, by what you're doing with it
Skip the "best microphones of 2026" listicles that rank fifteen mics with no context about who's using them for what. Here's what actually matches the use case:
- Gaming voice chat only, no recording: don't buy a dedicated mic at all — a $50 to $80 gaming headset with a boom mic (HyperX Cloud II, SteelSeries Arctis Nova) is genuinely fine for Discord, and spending more here is money better put toward headphones or a monitor.
- Solo streaming on Twitch or YouTube: Elgato Wave:3 ($99.99) or Rode NT-USB Mini ($99) — both cardioid condensers that sound clean in a normal bedroom and integrate directly with streaming software without extra drivers.
- Solo podcasting, untreated room: Shure MV7 ($249) or Rode PodMic USB ($199) — dynamic capsules that reject room noise and give you the option to move to XLR later without buying a new mic.
- Multi-guest podcasting, recording separate tracks: Shure SM7B ($399) per host, run through a Rodecaster Duo ($329) or a Focusrite interface with individual gain control per channel.
- WFH video calls and presentations: Audio-Technica AT2020USB+ ($149) sitting just out of frame — noticeably better than any laptop mic, and it doubles as a decent entry-level podcasting mic if that ever becomes a side project.
The marketing specs that don't tell you anything
Sample rate and bit depth on the box — "24-bit/192kHz recording" — sound impressive and matter almost none for spoken voice. Human speech lives comfortably within a frequency range that 16-bit/48kHz captures without any audible loss; the higher numbers matter for music mastering, not for a man talking into a mic about video games or car maintenance. "Studio quality" on the packaging means nothing specific — there's no certification body behind that phrase, and it appears on $40 mics and $400 mics alike.
RGB lighting on a microphone (looking at you, several gaming-branded USB mics released this year) adds cost and adds nothing to how you sound — it's there because it photographs well on a desk setup, not because it improves audio. The one spec worth actually checking before buying is the frequency response chart, if the manufacturer publishes one, and whether it's flat through the 100Hz–8kHz range where the human voice does most of its work — a mic with an aggressive bass boost baked in will make every voice sound artificially deep in a way that gets tiring within the first ten minutes of listening.